|
Here’s Our Latest Evolution in Seed Germination

We were having a heck of a time getting our seeds to germinate past a certain size. They would sprout, grow and then when they got to be about one inch high, they would start to croak. We put them in the Greenhouse under natural Light. We put them in the Growroom under fluorescents and then LED’s; but the same thing kept happening. It was a real mystery.
We were able to save most of our seedlings; but we were being forced to plant them into the Growroom or Greenhouse Systems while they were very small causing them to take up precious grow out space for way longer than necessary.
Above, you see our solution and it’s working like a charm. This is a Shallow Flood & Drain Grow Bed full of seedlings. We’re calling it our Seed Incubation Table (SIT™); and are having fun with the acronym because it’s all about putting them in the Bed and then comes the “Sit and Wait” part of the process. We quite literally don’t have to do another thing as the seedlings are being automatically watered with the system water, which eliminates daily watering.
 This new system even allowed us to leave our sprouted seedlings in the SIT™ for longer than they needed to be there while we finished building our new 80º Vertical System.
While we’re talking about seeds, let’s go through a little lesson on how to plant them. You need a few things to germinate seeds starting with a Seed Starter Kit, which we sell on our Aquaponics USA website. So the next question is what do you do with the Kit? You take the Seed Tray and the Seed Planting Cube with 98 Seed sites and soak them in your bath tub or in a tray that is deep enough to cover them with water.
But this is not ordinary water. This water has to have a pH of 5.5. Now we need to go further into the chemistry weeds on this subject because we need to explain what the heck is pH?
The “H” in pH stands for Hydrogen and the “p” stands for the power of that Hydrogen–the concentration of hydrogen ions in a solution. That Hydrogen concentration is very important for living things because Hydrogen ions are positively charged and can, therefore, alter the charge environment of other molecules in a solution by putting a force on the molecule causing it to change its normal shape. For a protein molecule this is crucial because the shape of a protein is related to its function. A low pH count corresponds to a high hydrogen ion concentration and a high pH count corresponds to a low hydrogen ion concentration. A substance that when added increases the concentration of hydrogen ions (lowers the pH) is called an acid; and a substance that decreases the concentration of hydrogen ions (raises the pH) is called a base. There are also substances that enable solutions to resist pH changes when an acid or base is added. These substances are called buffers. Buffers help organisms maintain a relatively constant pH. Pure water is considered neutral with a pH of 7. Solutions with a pH less than 7 are said to be acidic and solutions with a pH greater than 7 are said to be basic or alkaline.
Tilapia prefer a pH range of 7-8, which is on the alkaline side of the scale. But most Aquaponic farmers keep their pH levels between 6.8 and 7.0, which is a compromise for the fish and the plants as the plants prefer a more acidic environment. Drastic shifts in either direction can be lethal to both the fish and the plants. So watching pH levels is very important in aquaponics.
So that means you also need to have a pH Meter, which it just happens we also sell on our site. You start by calibrating your meter according to the instructions on the box. Then you measure what the pH is of your water as it comes out of your faucets. Your goal is to soak your Seed Cube in a pH environment of 5.5, which means you need to start your seeds in an acidic environment.
If your water is alkaline, meaning it has a natural pH of 7 or above, you have to make it acidic; and you do this by adding good old Distilled White Vinegar.
You carefully add the vinegar while watching your pH Meter until it goes to 5.5 and stays there. Then you place your seed tray with the seed cube into the water and let it soak for about a half hour.
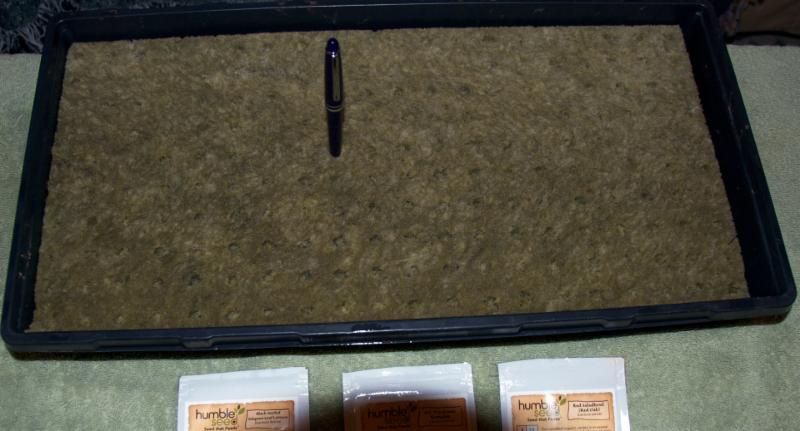
Once your tray has soaked up the 5.5 pH water, you take it to the location where you’re going to plant your seeds into it; and perform a simple final act before doing that. You take a pen or pencil and open the holes in the cube so you can easily place your seeds into them.
I have my Humble Seed packages ready to be planted into the Seed Cube. We sell these great seeds on our website. Humble Seed’s premium herb, fruit, and vegetable seeds are packaged in re-sealable Mylar® bags then themed and bundled in FDA food-safe containers. Once you get your seeds planted into the Seed Cube, you need to label them so you know what’s what when you plant them into your Grow Beds. We use large popsicle sticks that you can get in the Craft Deptartment of Walmart. We cut them so they don’t obstruct the humidifying dome when it’s placed onto the tray. We used a different Brand of Seeds here because it’s easy to see them in their seed sites. The company that sells these seeds is called Parmount Seeds; and they specialize in seeds for large Greenhouse operations. The final step of seed planting is finding the perfect location for your seeds to sprout. You can actually leave them indoors in the dark for a couple of days before you place them in the sun or under Grow Lights. We’ve tried a lot of different places and lighting to start and grow our seeds ending up with the new SIT™ solution that is working so well for us.
But if you don’t have an aquaponics set up that warrants it’s own Flood & Drain Table, you can place them on a shelf in your Greenhouse, in an empty Grow Bed, on a table under a Grow Light or even on a window seat that gets lots of sunlight.
 In this photo, we’re sprouting our seeds using Seed Kits with 6″ Humidifying Domes placed inside an empty Deep Media Bed in our Greenhouse. At that time, we were demonstrating 60º Vertical Growing instead of the 80º Vertical Growing we’re now demonstrating. Later, we moved that Grow Bed over to the other side of the Greenhouse where it’s growing 3 incredible Tomato Plants today and built a sprouting shelf where it sits. In this photo we’re sprouting our very first batch of seeds to plant in the five Deep Media Grow Beds we originally installed in our Greenhouse. These seedling trays started with 3 inch tall Humidifying Domes and went to 6 inch Domes. A few days before planting, we simply removed the Domes because the seedlings got too tall for them.
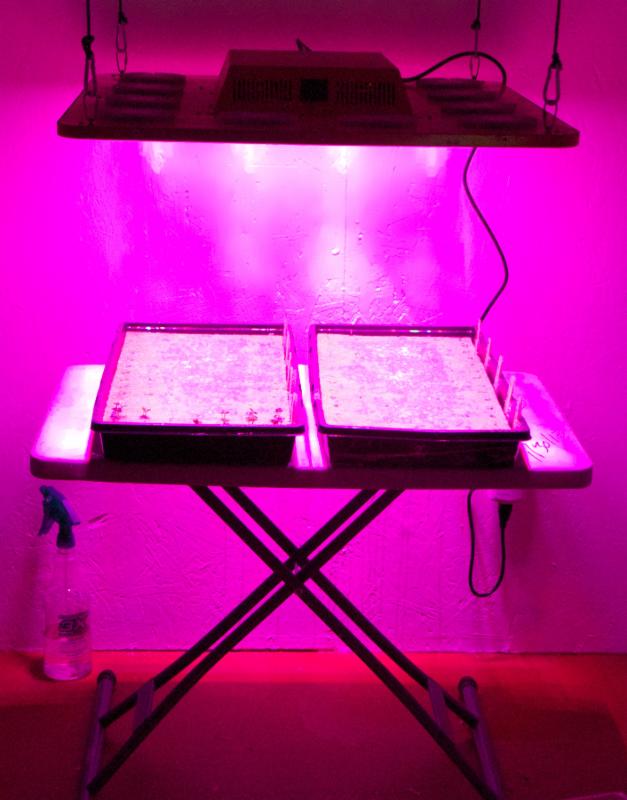
And in this photo we’re using an LED Grow Light and a portable table to sprout our seeds. Believe me, we’ve tried it all; and finally landed on what we described above as our SIT™ system.
Notice the spray bottle under the table on the left. If you don’t have a self watering SIT™ set up for your seeds, you’ll need to hand spray them using system water a couple of times a day until you plant them.
|